'' يناير 2017 مدونة سمسم للمعلوماتية يناير 2017

اتص بنا

مرحبا بكم في مدونة سلانكي | الأفضل لكم

الخميس، 26 يناير 2017

Elephone EleCam Explorer Elite Review

Elephone EleCam Explorer Elite
In trying to compete with more premium brands, some action camera makers are pushing the envelope in terms of quality at lower price points. Some of the best devices in the affordable category, while not on the same level as the latest GoPros, come reasonably close to the leading players, but at a fraction of the cost.
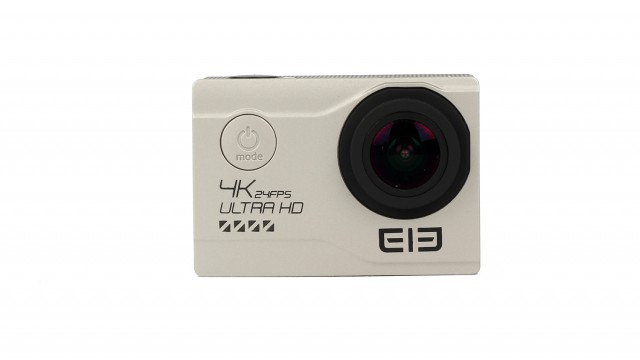
One of those devices that is touted to offer great value for money is the Elephone EleCam Explorer Elite. It comes in below the $70 mark, so it certainly delivers on the cost front. And, being powered by a proven and competitive chipset in the entry-level market, it seems to have what it takes to deliver quality videos. But, how does it perform in real life?
What's in the Box?
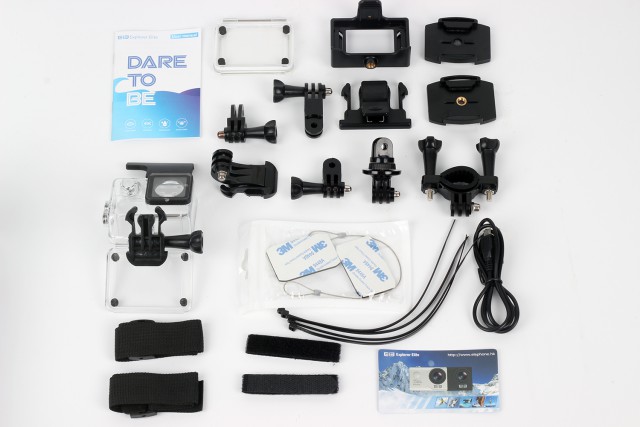
Elephone has packed all the accessories you can expect to get with an action camera. Among the most important are the waterproof case with a separate back door that lets more sound through, flat, curved, and handlebar mounts, and the joints that let you adjust how it's positioned.
The EleCam Explorer Elite also has a USB cable in the box, to charge the 1,050mAh battery and transfer files to a PC. With the USB cable it can also be used as a webcam, though you do not get much in the way of configuration options when using it in this mode.
Elephone EleCam Explorer Elite box contents
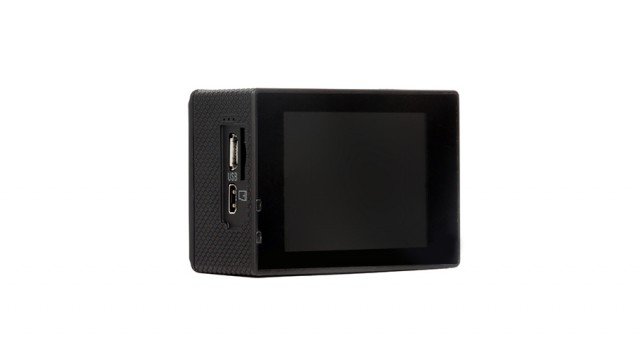
Design and Ease of Use
The action camera can be had in two colors: silver and black. My review unit is in the former color -- this only affects the front panel, as the rest of it is black regardless. It looks pretty sleek, but what's it like to use?
The good news is that you really don't need a smartphone app to control it, as there is a large display on the back to help you navigate through all the menus. Every feature can be configured through its setup menu.
There are two buttons on the side to scroll through the menu, one at the top to confirm a change and one at the front that lets you cycle through the modes (video, photo, gallery and menu). It is really easy to use once you get used to where the buttons are and what they do.
Elephone EleCam Explorer Elite display
What you may find confusing is that there is no option to rotate the video, so if you shoot with the camera upside down you will have to rotate the video after the fact. That is annoying, especially because the camera does know which side is up -- if you record upside down the timestamp will have the correct orientation -- thanks to its built-in gyroscope. It only does not let you change it.
Another weak area is the smartphone app. Luckily, you have the display on the back for configuring the EleCam Explorer Elite, but if you want to use your smartphone to control it you will not have many options available. You will still be able to start and pause recording, for instance, but no advanced setup options.
For those who are interested in using it as a dash cam, the EleCam Explorer Elite can serve that function well. It has various options that let you configure it for that kind of environment, including one that lets you add your license plate to the video.
4K? Not Quite
The EleCam Explorer Elite is one of the most affordable action cameras that promises 4K video. As I explained in my ThiEye i60 4K review, vendors tend to cheat when they promise UHD at such price points. And that is also the case here, as the Novatek 96660 chipset cannot handle native 4K video -- so, to give you that option, the video is upscaled. There is only a single 4K frame rate available, and that is 24FPS.
Because of this, I decided to test the EleCam Explorer Elite in 1080p at 60FPS -- which it can handle just fine, without any tricks. This is the mode which gives you the smoothest video, because of the higher frame rate, and a nice compromise between storage and quality -- at a bitrate of around 22Mbps an hour of video will take roughly 9.66GB in 1080p 60FPS mode.
Needless to say, the EleCam Explorer Elite also supports other video recording modes, like 1080p 30FPS and 720p 120FPS, the latter of which is a good choice when you want to do slow-motion videos.
Refocusing?
Before getting to video quality I should mention that the EleCam Explorer Elite unit I received for this review had the lens out of focus. When I say out of focus, keep in mind that this only applies if you want to record objects at a longer distance from the camera, like incoming cars. If, on the other hand, you want to shoot videos of things closer to the camera, you will not have this issue.
Adjusting the focus on the action cameras I have used so far takes a bit of effort. You only need to rotate the lens to get it right. Getting the lens to rotate is a bit tricky, however, as you need to pull the front panel and remove the glue that holds it in place.
Once that's done, you are looking at a process that involves a bit of trial and error to get the focus how you want it to. With the EleCam Explorer Elite, I hooked it up to my laptop as a webcam and, with a webcam program that let me use it in live view, I found a focus setting that worked on the screen.
I marked it with a pen, so that I could have a place to start, then I rotated the lens in both directions to see how it impacts the focus. Using photos snapped with the camera I finally found a position for the lens in which the focus is where I expect it to be.
The first videos I recorded had the close objects in focus, but in the distance you could see things getting blurry. I actually had this problem before, with my Xiaomi Yi, and I am sure that there are other cameras with this kind of setup from the factory. After the refocusing, videos looked just as I expected them to. The difference is huge, so if you have this sort of problem you may want to adjust your action camera's focus too.
Video Quality
My frame of reference for the video quality of the EleCam Explorer Elite is my Yi and the SJCAM SJ5000X Elite. They are in the same category as the Elephone-branded action camera, and popular options with folks who shop in this price segment.
What I have found is that the EleCam Explorer Elite gets close but is not quite on the same level in terms of quality as the SJ5000X Elite. Both have the same chipset and sensor, based on official information, but SJCAM does a better job of getting more detail from its action camera. (I am sure that this could improve with a firmware update, but sadly there isn't a newer one available than the version my review unit shipped with -- 20160722 v1.0.)
That said, the EleCam Explorer Elite is much, much more impressive when compared to my Yi, which is modded to record at a significantly higher bitrate (35Mbps compared to 25Mbps standard in 1080p 60FPS mode). And it is also much, much better than the i60 4K I reviewed a while back.
The quality of that the EleCam Explorer Elite delivers is actually quite good. Things suffer in low light, but in daylight you will be pleasantly surprised by how nice the videos look considering how much Elephone is asking for it.
To give you an idea of the video quality, you can check some sample videos below from a trip I took with a friend earlier this month. All are recorded at 1080p, 60 FPS, as I mentioned above. Check my YouTube account for samples of the i60 4K, for comparison.

Conclusion
The EleCam Explorer Elite is an interesting proposition in the action camera market. It is very affordable, coming in at $69.79 on GearBest, and it delivers good video quality too. Would I recommend it? Taking everything into account, yes -- as long as you don't mind getting your hands dirty to adjust the focus.
At a higher price it would be harder to recommend, knowing that there are some strong players out there -- like the SJ5000X, GitUp Git2 and Hawkeye Firefly 6s, but at this price it is really hard to beat.
link of this camera in Greadbest
 http://www.gearbest.com/action-cameras/pp_398128.html

مرحبا بك

Résumé qaisi1web

الأحد، 15 يناير 2017

Review The Canon EOS 1300D


Introduction

The Canon EOS 1300D (otherwise known as the Digital Rebel T6 in North America) updates the EOS 1200D / Rebel T5 as Canon’s entry-level DSLR marketed squarely at first-time DSLR buyers. The new camera is more evolution than revolution though, as it carries over many of its predecessor’s key features. Consequently the 1300D gets the same 18MP APS-C sensor paired with a near-identical Digic 4+ processor, resulting in a modest 3fps continuous shooting rate and a maximum standard sensitivity of ISO 6400.
Full HD video at 30fps is available, as is a Video Snapshot mode that combines short video clips into a montage sequence. The 1300D also sports a higher resolution 920k-dot LCD screen, but its biggest improvement over the 1200D is the addition of built-in Wi-Fi with NFC pairing. Now you’ll be able to wirelessly transfer images to a mobile device for sharing, as well as remotely control the camera from a smartphone or tablet.
The Canon EOS 1300D is now available body-only for £299.99, or bundled with Canon’s 18-55mm III (non-stabilised) kit lens for £344.99, as well as the more versatile 18-55mm IS II lens for £384.99/$549.

Ease of Use

Externally the Canon EOS 1300D bears a close resemblance to the 1200D. Control and button placement is as good as identical, and so too is the camera’s physical size and weight. At 129mm wide, 101.3mm high and 77.6mm deep, the 1300D is 0.6mm narrower and 0.3mm shallower than the 1200D, but 1.6mm taller. The new camera also weighs almost the same at 485g ready to shoot. That makes it 25g heavier than a Nikon D3300, and the Nikon is also smaller than 1300D in every dimension, measuring 124 x 98 x 75.5mm.
However, such marginal size and weight differences have little impact in real world shooting. Here the 1300D’s carbon fibre polycarbonate body feels reasonably solid and well built, though predictably for an entry level Canon DSLR, it isn’t weather sealed. If that’s a deal-breaker for you and you can’t stretch to a water and dust-resistant EOS 70D, then the weather-sealed Pentax K-S2 is worth considering. The 1300D also works well ergonomically, with a decent-sized rear thumb rest and the exposure compensation and playback zoom buttons positioned conveniently on either side of it. The main hand grip is nice enough, but the finger recess is a little shallow, which can make it difficult to grasp comfortably if you’ve got larger hands. Still, given the 1300D’s light weight, this isn’t a major bugbear.
A primary selling point of the Canon EOS 1300D to first time DSLR buyers is its ease of use. Little has changed in this respect from the 1200D, but that’s no bad thing. The 1300D still gets dedicated ISO and white balance buttons on the rear panel – physical controls you won’t find on a Nikon D3300 – while other key shooting settings like file quality and exposure modes can be accessed easily by pressing the Q button which activates the quick-access menu. This will also let you adjust the +/- 5EV of exposure compensation, but it’s quicker and easier to set this by pressing the dedicated exposure compensation button located immediately above the Q button whilst rotating the single, top-panel control wheel.
Front of the Canon EOS 1300DCanon EOS 1300D Review Image
As well as the clear and functional quick-access menu, the main menu is also well laid out and easy to navigate. A total of ten menu tabs split into shooting, playback, camera settings and a My Menu customisation tab can be scrolled across using the control wheel or rear panel directional buttons. The menu functions are mostly logically positioned, though a few features are less easily accessible. For instance, if you want to reveal the camera’s expanded ISO 12800 sensitivity, this is hidden away on page 2 of the Custom Functions menu entry.
Another aspect of the Canon EOS 1300D which isn’t immediately intuitive is the mode dial. It’s cluttered with various scene mode settings, including Night Portrait, Food, Sports, Macro, Landscape, and Portrait presets. There’s also a Creative Auto mode that operates exactly as regular Auto mode, except you control the extent of background blur you’d like behind your subject by adjusting a virtual slider. All this does is adjust the lens aperture, so once you’ve learnt about aperture, good old aperture priority mode renders Creative Auto pointless. Aside from the usual selection of auto, semi-automatic and manual modes, the 1300D’s mode dial also includes a video mode and a Flash Off mode, whereby the camera shoots automatically but won’t fire the flash; useful in museums or religious buildings.
Returning to the rear panel and, along with the dedicated ISO and white balance buttons, the 1300D also offers a convenient drive mode button. This lets you choose between single shot, continuous, self-timer with a 10-second or 2-second delay, and also a continuous self-timer function where the camera will snap a burst of shots after an initial delay. Standard continuous shooting speed is unchanged from the 1200D and is still a rather sluggish 3fps, mainly due to the 1300D using essentially the same image processor. The 1300D does get a Digic 4+ chip compared to the 1200D’s plain Digic 4 device, but the only obvious enhancement this brings is an increased buffer capacity. Where the 1200D could only manage to shoot a burst of 69 JPEGs at 3fps, the 1300D can fire off 1110 JPEGs, though still only 6 consecutive RAW images. It’s quite an increase, but upping the burst shooting speed to 5fps to match the Nikon D3300 would have been more useful.
Rear of the Canon EOS 1300DCanon EOS 1300D
Another area where the new Canon still trails the two year old Nikon D3300 is video, although the difference is slight. Both cameras will shoot Full HD 1920 x 1080 resolution, but where the D3300 can do so at 60fps, the 1300D can only manage 30fps. Shooting a video first requires you to rotate the main mode dial to the video position, where you can then press the Live View button located alongside the viewfinder to start and stop recording. The 1300D also includes a Video Snapshot feature, whereby the camera will record video clips lasting two, four or eight seconds and compile them into a Video Snapshot Album (a montage sequence) with the option to add your own background music.
While most of the hardware inside the Canon EOS 1300D has been carried over from the 1200D, the new camera does sport an uprated LCD monitor. The 3-inch size remains the same, as does the 170-degree horizontal and vertical viewing angles, but the 1300D’s monitor boosts resolution from a paltry 460,000 dots to a more respectable 920,000 dots. This is particularly useful when shooting close-up shots using live view, where focussing accuracy is critical. Sadly, the screen doesn’t feature touch sensitivity. This makes sense in terms of cost cutting, but it isn’t such a smart move when you consider a significant portion of 1300D buyers are likely to be young first-time DSLR buyers used to touch-driven photography.
Canon EOS 1300D
Top of the Canon EOS 1300D
But the most significant new element of the 1300D is its built-in Wi-Fi with NFC pairing. The system uses Canon’s Camera Connect mobile app to enable wireless image transfer and remote camera control. Connecting your smart device is painless, and once linked, the 1300D can be controlled remotely with very little signal lag. The app also lets you control shooting functions like ISO sensitivity, exposure compensation and the drive mode. When it comes to sharing your shots, the Wi-Fi link transfers a full resolution image almost instantly, although image previews do take a couple of seconds per shot to preview properly when scrolling through your memory card’s images. Considering that the Nikon D3300 requires you to purchase a WU-1a dongle to get Wi-Fi connectivity, Canon’s built-in system is certainly a step up in value and convenience. However it’s worth remembering that, as extra features go, Wi-Fi is no longer cutting edge, high-end tech. After all, a basic Canon IXUS 180 compact camera packs Wi-Fi with NFC for less than £130.
When it comes to shooting, the Canon EOS 1300D will switch on and fire a shot in around 0.7 seconds, although it takes a second or so longer for the LCD screen to display anything. Focussing speed is largely dependent on your choice of lens. Our 1300D test sample came paired with Canon’s excellent 18-55mm IS STM optic, which is the kit lens for the 750D. The 1300D’s kit lenses (for the UK market at least) are either a basic, non-stabilised 18-55mm lens, or the 18-55mm IS II lens. Given the 1300D’s mediocre high ISO performance, going for the non-IS lens and relying on faster shutter speeds and higher sensitivities isn’t advisable. The 18-55mm IS STM lens is smoother and quieter to focus, but you’d need to buy the camera body and this lens separately; a combo that costs £90 more than the 18-55mm IS II kit, and that’s a tough price hike to justify to a beginner. It’d make more sense to put the same money towards an entry-level telephoto lens in order to experiment with shallow depth of field effects.
The Canon EOS 1300D In-handCanon EOS 1300D
Whichever lens you choose, the Canon EOS 1300D’s 9 AF points are well spread across the image frame, and though only the central point is the more accurate cross-type, autofocussing in our hands was quick and mostly accurate in all but the darkest conditions. Switch to live view and things get much slower though, with contrast-detect focussing requiring a second or so to establish maximum sharpness and correct focus. However, this needn’t be a major issue when using live view to compose and shoot shots like close-ups, where careful consideration and an eye for detail are more important than speed.
Last but not least is battery life, which is unchanged from the 1200D at 500 shots from the LP-E10 rechargeable Li-ion power pack. That’s pretty good when compared to the 750D that can only manage 440 shots per charge, however, as with so many of the 1300D specs, it lags way behind the D3300’s impressive 700-shot CIPA rating. It’s also worth noting that the 1300D’s battery compartment on the bottom of the camera also contains the memory card slot, which is a little fiddly to access and can also be blocked completely by larger tripod mounting plates. The D3300 and 750D’s conventional side-accessed card slots are much more convenient.

مرحبا بك

Résumé qaisi1web

Review The Panasonic Lumix DC-GX800


Introduction

The Panasonic Lumix DC-GX800 (also known as the GX850 and GF9) is a new camera to sit in the entry-level end of Panasonic’s line-up. The camera replaces the GF line, which no longer exists in the UK. Instead, there are now three models in the GX line in an attempt to simplify the options for a consumer - you can move up or down the line depending on your needs. Marketed as the “most affordable 4K CSC”, the Panasonic Lumix DC-GX800 features a 16 million pixel Four Thirds sensor, a flip-up 1040k-LCD screen, Wi-Fi connectivity and 4K video and Photo. It will be available for under £500 / $549.99 (including the 12-32mm kit lens) and you can choose from four different colour ways.

Ease of Use

The Panasonic Lumix DC-GX800 is the smallest CSC in Panasonic’s line-up, and indeed it’s one of the smallest currently available on the market. You could be forgiven for thinking, especially with the small pancake kit lens attached, that it’s a premium compact camera.
This makes it ideal for those who want to always have a camera on them, but don’t want to carry something bulky and heavy around with them. As this is a camera marketed at entry-level users, the design and usage of the camera has been kept pretty simple.
There are four different colour variations to choose from, some of which are exclusive to certain retailers. The one we have been supplied is a black and silver version, which has a ‘classic’ look to it.
As standard, you can buy the Panasonic Lumix DC-GX800 with the 12-32mm retractable kit lens. This folds away neatly when not in use, making the camera small enough to fit in a jacket pocket. You will need to extend the lens manually before you can shoot though, so it may be worth leaving the lens extended if you’re planning on photographing a few things in quick succession.
Panasonic Lumix DC-GX800
Front of the Panasonic Lumix DC-GX800
Dials and buttons are kept to a minimum for this camera. On the right hand side of the top plate there’s a mode dial for switching between the various exposure modes which the camera offers. Despite the fact that this camera is aimed at beginners, it’s possible to shoot in manual and semi-automatic modes. You’ll also find options such as automatic, scene, panorama and digital filters.
Next to the mode dial is on the on/off switch, which encircles the shutter release button. Just behind the shutter release is a button which you can use to switch on the 4K Photo Modes. These have proved popular in previous Panasonic releases, so it’s no surprise to see them here. Using 4K Photo allows you to extract a still from 30fps 4K video recording. There are three options to choose from when you use this mode. You can either shoot a two second burst and have 60 frames to shoot from, or you can start recording with a press of the shutter release button, stopping it again with a second press. Finally, you can keep recording so long as you have the shutter release button held down.
In the middle of the top plate there’s a pop-up flash, which you can activate by flicking a small switch just underneath it. There’s no electronic viewfinder, and there’s also no hotshoe or means of attaching an external one either.
Panasonic Lumix DC-GX800
Rear of the Panasonic Lumix DC-GX800
On the far left hand side of the top plate, there’s a button which you can use to switch on Post Focus. Another consequence of 4K capability, Post Focus allows you to take a photo of something, and choose the focus point afterwards in playback. It does this by recording a short video at different focus points, you simply tap on the point afterwards and press the “Set” button to save a JPEG version of the image you want.
Moving to the back of the Panasonic Lumix DC-GX800, the majority is taken up by the touch-sensitive and tilting 3-inch screen. The screen can be moved to face forwards, making it useful for selfies and group shots. Because the screen flips up at the top, you can mount the camera on a tripod, or place it on a stable surface like a table or wall, and still use the tilted screen to compose your shot. It’s not possible however to make the screen tilt downwards, or to the side, making it slightly less useful for some awkward angles, such as shooting from above.
All of the buttons on the back of the Panasonic Lumix DC-GX800 are grouped on the right-hand side, making it easy to use this camera one-handed - and the small size of the camera certainly encourages such methods of shooting. Again, there’s not a huge number of buttons here, but if you’ve ever used a Panasonic camera before you should be familiar with what is available.
Panasonic Lumix DC-GX800
Tilting LCD Screen
There’s a four-way navigational pad, with each of the directional keys having a specific default function. Down controls drive mode and timer, left controls AF mode, up accesses exposure compensation, while right gives you access to white balance controls. There is a button in the middle of the pad which can be used to make selections, or access the main menu. The navigational pad also doubles up as a scrolling dial which you can use for a variety of settings, depending on what you’re doing at the time. If you are shooting in aperture priority mode, for example, the scrolling dial will alter aperture. If you’re looking at images in playback, the scrolling dial will allow you to move through the different images you have taken.
There are four more buttons on the back of the Panasonic Lumix DC-GX800. Just above the rubberised thumb rest is a video record button - this is neatly tucked out of the way so as to avoid accidental movie recording. There’s also a playback button, a display button and a button which accesses the quick menu when in shooting mode, or acts as the back/delete button when in playback or moving through menus. The quick menu is particularly useful on a camera like this which doesn’t have a vast array of dials and buttons to give you instant access to certain settings - here you’ll find options such as ISO, image quality, metering and so on.
If you want to set up the Panasonic Lumix DC-GX800 to work in a different way, you’ll be pleased to know that three of the physical buttons on the camera can be assigned to different options than the default, while there are a further five “virtual” buttons, which are accessed on the touchscreen to give you a more direct route into certain settings. You can also customise the quick menu, which is useful if you find you’re not using a certain setting all that often, or there’s something missing which you like to change often.
Panasonic Lumix DC-GX800
The Panasonic Lumix DC-GX800 In-hand
The Panasonic Lumix DC-GX800 accepts Micro SD cards, rather than full sized ones. It’s worth mentioning that in case you have a stack of SD cards that you want to use with this camera - it’s relatively affordable and easy to pick up Micro SD cards these days, and many mobile phones accept them, so you may already have  at least one available. The slot is found next to the battery, behind a door which protects both. Another thing to note is that the GX800 supports in-camera charging, which means that the camera doesn’t come with a separate charger.
Start-up time is quick, especially if you already have the kit lens extended (or indeed if you’re using a different lens which doesn’t need extending).
Focusing locks on quickly and accurately in the majority of situations, but if you’re faced with a very dark situation then the Panasonic Lumix DC-GX800 can struggle a little. There’s a focusing lamp to assist in these situations, and it’s pretty rare for a false confirmation of focus to be displayed. The GX800 copes reasonably well with following a moving subject so long as the active AF point is kept over the subject - if you’re photographing something with a fairly predictable path you should be OK, but anything a little more erratic and you may struggle.

مرحبا بك

Résumé qaisi1web

Review Canon PowerShot SX720


Introduction

Canon’s latest superzoom travel compact camera, the Canon PowerShot SX720 HS, features a 40x optical zoom lens, which is an equivalent of 24-960mm in 35mm terms. A digital zoom (called Zoom Plus) of 80x is also available. A further digital zoom of 120x can also be used. It also has a 1/2.3-inch type back-illuminated CMOS sensor which has 20.3 million pixels. The sensor is joined by a Digic 6 processor. Other features include Full HD video recording at 1080p, inbuilt Wi-Fi and NFC and a rear 3.0-inch, 922k-dot LCD screen. The Canon PowerShot SX720 HS is a replacement for the SX710, which featured a 30x optical zoom. Its main competitor in this sector of the market is the Panasonic Lumix DMC-TZ80 which features a 30x optical zoom. The Canon PowerShot SX720 HS retails fpr £299 / $379.

Ease of Use

The Canon PowerShot SX720 HS has a slim design, which is pretty remarkable when you consider that it features a 40x optical zoom housed within a relatively small body. You can slip the SX720 into your pocket, so long as you don’t have very tight jeans on.
Canon has gone for a brushed metal look which makes the SX720 look stylish, while the rounded corners of the camera body also add to an overall sleek appearance.
On the front of the Canon PowerShot SX720 HS is a rubberised grip section which your middle finger rests along. It helps the camera to fit snugly in your grip and gives you confidence that you’re not going to drop it. On the back of the camera there’s also a small textured area just next to the mode dial where your thumb rests naturally.
Canon PowerShot SX720 HS
Front of the Canon PowerShot SX720 HS
The button layout on the SX720 is relatively simple and straightforward - especially so if you’ve ever used a Canon compact camera before. On the top of the camera is the shutter release button, which is surrounded by a zoom rocker. There’s also an on/off switch, along with a video record button.
On the left hand side of the top plate you’ll find the inbuilt flash, but when you want to use this, you’ll need to eject it from its housing using a switch on the side of the camera. Just underneath this switch and back a little bit you’ll find the Zoom Frame Assist button. This is a very useful feature, especially for a camera which features such a high optical zoom.
Basically, if you’re photographing something while using the zoom (whether at the full 40x stretch or a more modest focal length) and the subject moves out of the frame, you hold down the zoom frame assist button and the lens will zoom out, allowing you to find the subject again. Release the button and the lens will automatically return to the same focal length you’d just been using - it’s much quicker than using the zoom rocker switch.
Canon PowerShot SX720 HS
Rear of the Canon PowerShot SX720 HS
Moving to the back of the Canon PowerShot SX720 HS and there’s a familiar Canon button layout. At the top of the back there’s a mode dial which allows you to switch between the various exposure modes on offer. Like with the previous generation of this camera, the SX720 offers manual and semi-automatic control - you can find P/Av/Tv/M modes on the dial. There’s also Auto, Hybrid Auto, Live, Scene, Creative Shot, and Movie mode. We’ll go through some of these modes further on in the review.
Underneath the mode dial is the playback button and a button which you use to directly access the Wi-Fi mode on the SX720. Underneath this is a navigational pad, which has four directional keys surrounded by a small dial. Each of the keys has a specific function assigned to it, for example up allows access to exposure compensation, left is used for changing the focusing mode, down for accessing the timer (or delete in playback), and right is for changing the flash mode. The dial is used when altering a setting - for example if you first press the up button to access exposure compensation, you can then move the dial to increase or decrease exposure compensation.
The dial is also used when altering shutter speed or aperture depending on the shooting mode that you’re using. If you’re shooting in manual mode, you’ll need to press the up key (marked as exposure compensation)to switch between altering shutter speed and aperture.
Canon PowerShot SX720 HS
Top of the Canon PowerShot SX720 HS
In the middle of the navigational area is a function/set button. Press this while in shooting mode and a quick or function menu will appear which gives you the opportunity to change all the most commonly settings, such as ISO, white balance, aspect ratio and so on.
Finally, the last two buttons are an info button which changes the information displayed when either in shooting or playback mode, and a Menu button which gives you access to the main menu - you can use this when the quick menu isn’t enough, for example if you have to change the date or time settings.
Although the Canon PowerShot SX720 HS affords you semi-automatic or manual control, you can’t shoot in raw format. That’s perhaps a little disappointing for this camera, but it’s not that much of a surprise. It would be nice if for the next generation of the camera, you could shoot raw format though - it would be a much more appealing camera to enthusiasts looking for a travel compact camera.
Canon PowerShot SX720 HS
Side of the Canon PowerShot SX720 HS
Hybrid Auto is a fun mode which has been included on several Canon compact cameras before. Basically, it creates a two-second video before you take each shot (it starts recording from the moment you half press the shutter, but only saves the two seconds preceding the shot). At the end of a calendar day the camera will amalgamate all the shots together into a video - it’s great for holidays, wedding, occasions and so on, as you not only have the shots you’ve taken, but a video clip you can watch too. However, it’s not perfect - it would be nice for example if you could edit which clips end up in the final video. It would also be nice if you could switch on this video capture when shooting in manual or semi-automatic modes - just because you’ve taken manual control doesn’t necessarily preclude you from wanting this fun video.
Creative Shot mode is a fun way to experiment with how your images will look. Move the mode dial to this mode, and every time you take a shot, the camera will apply five different crops, filters, or combinations thereof to your image. You don’t have a choice over which crops or edits are made, but you can choose from groups of different options, including “Auto”, “Retro” and “Monochrome”.
Canon PowerShot SX720 HS
The Canon PowerShot SX720 HS In-hand
It’s not possible to change the autofocus point for the Canon PowerShot SX720 HS, which seems like a bit of an oversight for something which otherwise affords such a high level of manual control. You can choose the centre point, or switch on Tracking AF or Face AiAF which chooses a spot for you, giving priority to any faces in the shot.
Focusing is quick in day (or good) light, dropping a little more when you’re shooting in lower light. There’s a focusing light that will assist if it’s really dark, and it’s pretty rare for the camera to display a false confirmation of focus.
Start-up takes a couple of seconds, possibly because of the physical limitations of extending such a long lens at speed. Shot-to-shot time is pretty speedy though, while general operational speeds are also good.

مرحبا بك

Résumé qaisi1web

Review Camera Lumix

Close-up: Hands-on with the Panasonic Lumix DC-GH5


Hands-on with the Panasonic Lumix DC-GH5


Hands-on with the Panasonic Lumix DC-GH5

At first glance, the GH5 looks a lot like the GH4, but this hides probably the biggest step forward the GH series has made since its introduction. Like the previous iterations, Panasonic has been speaking with a range of video users to make sure the features they need are incorporated and work the way they want.
There are a host of technology improvements that make the GH5 significantly more capable than its predecessor.

مرحبا بك

Résumé qaisi1web

الجمعة، 13 يناير 2017

GoPro Hero4 Black review

GoPro Hero4 Black review: No longer top dog


Richard


23 Nov 2016
Our Rating 
Price when reviewed 
359
inc VAT


Page 1 of 2GoPro Hero4 Black review: No longer top dog


The GoPro Hero4 Black has fantastic image quality, but has since been superseded by the Hero 5 Black

Specifications

Sensor: 1/2.3in CMOS, Sensor pixels: 12-megapixels, Max recording resolution: 4K (30fps), AV connections: Micro HDMI output, 3.5mm microphone to Mini USB (optional), Size (HxWxD): 41x59mmx30mm, Weight: 89g (152g with housing), Warranty: One year RTB
Before we begin, it's worth dropping a quick mention that the Hero 4 Black is no longer the action camera flagship. This year's Hero 5 Black is the new action camera to beat. It's a completely new look, with a fully waterproof chassis up to a depth of 10m, and a brand new touch display.
While video and image quality is roughly the same, for roughly £50 more than the Hero 4 Black you can pick up the Hero 5, with Electronic Image Stabilisation, wind noise reduction and a far greater microphone. The Hero 4 Black is still a fantastic action camera and one of the best, but the Hero 5 slightly edges ahead thanks to its wealth of fancy new features. All that being said, you can check out my original GoPro Hero 4 Black review below.

GoPro Hero 4 Black review

At first glance, there’s not a lot to separate the GoPro Hero4 from its predecessor, the GoPro Hero3 Black Edition. This is mostly a good thing, as it means compatibility with a wide array of accessories and mounts; the camera’s incredible popularity means it’s easy to find all manner of compatible kit from GoPro itself and aftermarket manufacturers.
The Hero4 is available in two versions: Silver (£279) and Black (£359). The Black model has a faster processor and can shoot in either higher resolution or higher frame rates. The Silver has a built-in touch display, which is handy for framing your video and photos, and for providing a more intuitive method for changing settings. An optional LCD Touch BacPAC accessory (around £60) brings similar features to the Black edition. The Hero4 isn’t waterproof without its separate casing, so you’ll lose any touchscreen functionality as soon as it’s enclosed.
If you're after a smaller action camera, then you might want to consider the GoPro Hero4 Session. The newer diminutive cube-shaped camera is considerably smaller and lighter than both the Silver and Black and also benefits from 10m of waterproof protection without the need for a separate case. The Session does lack some of the higher resolution and bit rate settings of the Silver and Black, however. It also has an integrated, non-replaceable battery, which could also prove a problem for those out on long shooting session who are used to swapping batteries in the field.
Still, now that it's officially available for a reduced £249 it's a valid option if you prefer a less bulky action camera. If you're only after an entry-level camera or have a tighter budget, you can buy a Hero+ LCD, which is limited to Full HD resolution and doesn't have the same spread of features. GoPro itself has stopped selling these on its website, but you can pick up one at Amazon for around £220, but the price savings aren't big enough to warrant choosing this over a GoPro Hero Session.
GoPro Hero 4 Black no case
The casing for the Hero4 Black is the same as previous GoPro cameras, using the same spring-loaded buttons that still take a bit more effort than I'd like to press. You still have to remember each button’s action for navigating the menus, too.
You get two case back doors, with the standard door providing waterproofing to 40m. The skeleton backdoor doesn’t protect from the elements but the open back allows for better audio capture. There are mounts for flat, curved and vertical surfaces included in the box, but you’ll need to put the Hero4 in its case to use them.
A mini USB, a micro HDMI connection and a microSD slot are all hidden behind a cover. Annoyingly, the cover detaches completely and is small, making it easy to lose whenever you charge the camera. A hinged flap would be preferable as this was a problem I had with the Hero3 as well. GoPro has since acknowledged the issue with its newer cameras, with the Session and Hero range now all using hinged flaps that don't get lost so easily. The mini USB port can be used for charging, copying images and footage to a computer or used with an optional 3.5mm microphone adapter.
‘Watch Dog 2’ Fans Don’t Believe Black Hackers Exist
If you're mixing and matching GoPro cameras with newer models from the Session onwards, it's worth noting that newer GoPro cameras now use Micro USB for syncing and charging, which is preferable. It does now mean carrying two different cables if you have older cameras, however. It's safe to assume all future GoPros will now use Micro USB.
A very functional iOS, Android and Windows Phone companion app lets you control the camera’s settings as well as play back captured video via Wi-Fi direct. Once connected it was intuitive to use and was preferable to changing settings directly on the camera itself. The app also lets you copy footage from the Hero4 for sharing and uploading to social networks.
The app has a live view, which makes up for the lack of an LCD display on the Black edition. There’s around a half second delay between the camera and phone; it’s not quite as quick as Sony’s HDR-AZ1 but it’s not too jarring and certainly helps with framing shots. With Wi-Fi Direct turned on, Wi-Fi will remain active even if you turn the Hero4 off, with a blue light blinking on the front of the camera to let you know it's still on.
This means you’re able to remotely turn the Hero4 back on from your smartphone, but also means you’ll need to manually disable Wi-Fi to ensure the battery doesn’t drain while you’re not using the camera. I forgot a few times and came back to a dead battery, which was unfortunate. Holding the settings button on the side quickly toggles the Wi-Fi on and off, which is convenient provided you remember.

مرحبا بك

Résumé qaisi1web

Samsung Galaxy S7 review


Samsung Galaxy S7 review

By
Updated:
Awards

1 of 41

Play Video
Play
0:00
/
2:20
Share
Fullscreen
  • Galaxy S7 review
  • s7  13
  • s7 1
  • s7 5
  • s7 7
  • s7 9
  • s7 11
  • s7 13
  • s7 15
  • s7  1
  • s7  5
  • s7  7
  • s7  9
  • s7  11
  • Galaxy S7
  • Galaxy S7 1
  • Galaxy S7 2
  • Galaxy S7 3
  • Galaxy S7 4
  • Galaxy S7 5
  • Galaxy S7 6
  • Galaxy S7 7
  • Galaxy S7 8
  • Galaxy S7 9
  • Galaxy S7 10
  • Galaxy S7 11
  • Galaxy S7 12
  • Galaxy S7 13
  • Galaxy S7 14
  • Galaxy S7 15
  • Galaxy S7 16
  • Galaxy S7 17
  • Galaxy S7 18
  • Galaxy S7 19
  • Galaxy S7 20
  • Galaxy S7 21
  • Galaxy S7
  • Galaxy S7
  • Galaxy S7
  • Galaxy S7
  • Awards

Summary

Our Score:

Pros

  • Stunning looks
  • Great camera experience
  • microSD slot and IP68 water resistance
  • Glorious display

Cons

  • Fingerprint magnet
  • TouchWiz still has some quirks
  • Poor speakers

Best Deals for Samsung Galaxy S7

  • Compare plans
  • amazon
  • ebay
$0.00 upfront $45.00 /mth ($9.00 plan + $36.00 phone) 100 Minutes
$0.00 upfront $46.43 /mth ($12.80 plan + $33.63 phone) 1000 Minutes
Unlimited Messages
500 MB data info
$20.00 upfront $96.25 /mth ($70.00 plan + $26.25 phone) Unlimited National Talk & Text
Unlimited Messages
Unlimited data info
VIEW ALL DEALS POWERED BY

Key Features

  • 5.1-inch, quad-HD display
  • 3,000mAh battery
  • 12MP camera
  • Fast and wireless charging
  • MicroSD
  • Android 6.0.1 Marshmallow
  • 4GB RAM
  • 5MP selfie camera
  • Exynos 8890 processor
  • Manufacturer: Samsung
  • Review Price: £569.00

What is the Samsung Galaxy S7?

To use a tired cliche, Samsung has had a year of two halves. After the release of both the Galaxy S7 and Galaxy S7 Edge, things were looking strong. It had a phone that was better than the HTC 10, better than the Huawei P9 and it’s still better than the iPhone 7.
But then the exploding Galaxy Note 7 landed and Samsung took a bit of a hit. Is it enough to make you think twice about buying a Samsung device?
In a word, no. The Galaxy S7 is still the best phone we’ve reviewed this year. Maybe the Google Pixel phone will have something to say about that though?

Video: Check out our review of the Galaxy S7

Play Video
Play
0:00
/
2:20
Share
Fullscreen
Related: Samsung Galaxy S8

Samsung Galaxy S7 – Design

After the massive, and much needed, change in design direction Samsung took with the Galaxy S6 and Galaxy S6 Edge in 2015, all rumours pointed to things staying pretty much the same for the Galaxy S7.
Well, it’s not like Apple, HTC or Sony make drastic changes to their industrial design every year.
And that’s exactly the case here. Place the Galaxy S7 next to the S6 and you’d be hard pushed to instantly pick which one is which. Frankly, this doesn’t bother me in the slightest. The S6 was already one of the best-looking phones around, and the Galaxy S7 follows suit.
Both the front and back are covered in Gorilla Glass 4, while a metal rim snakes in between. Two volume buttons sit on one side, with a lock/standby switch on the other. It’s a clean look, with the back free from any markings aside from a Samsung logo.
The camera lens now sits just about flush with the glass body too. This might seem a small change, but it makes a big difference. I can now tap out an email with the phone flat on my desk without it jumping and rocking from side to side.
Related: Best smartphone 2016
Galaxy S7 3
There is one notable design change on the back – the sides now curve ever so slightly, just like they did on the larger Galaxy Note 5, and it makes a huge change to how the Galaxy S7 feels. While the S6 felt harsh and rigid, the Galaxy S7 slips softly into my palm. It’s so much more ergonomic and makes picking it up off a flat surface much easier.
And the way the sides almost melt into the glass just looks damn cool. Good job, Samsung.

Best Deals for Samsung Galaxy S7

  • Compare plans
  • amazon
  • ebay
$0.00 upfront $45.00 /mth ($9.00 plan + $36.00 phone) 100 Minutes
VIEW ALL DEALS POWERED BY
It’s an absolute fingerprint magnet, though. After a few minutes of use, the entire back becomes a grubby mess that needs wiping down with a microfibre cloth.
Along the top is the Nano SIM tray, which now holds a microSD slot, plus a microphone. The bottom houses the headphone socket, another microphone, a speaker and a micro USB port for charging.
That speaker is one of the few missteps on this phone. It’s downward-facing, gets easily blocked by my hands when playing a game and it sounds tinny and distorted at high volume. I guess front-facing speakers weren’t included so the screen surround could be kept minimal, but it’s still a disappointment when a speaker sounds this bad.
It had been suggested that Samsung would make a big switch to the new, reversible USB-C connector that’s already being used on the Nexus 6P, OnePlus 2 and LG G5, but it hasn’t.
To be honest, USB–C is more of a hindrance than a help at the minute. You can’t use any of the cables you’ve picked up over the years and it doesn’t necessarily mean faster charging. It does mean the S7 isn’t quite so future proof, though.
The front again has a clean look about it. The elongated home button still sits under the display, and it still juts out ever so slightly, rather than being concave like the iPhone’s. For me, this is a plus – it feels better pressing the Galaxy S7’s home button than the iPhone 6S’s – but a couple of the TrustedReviews team think otherwise. They’re wrong, of course, but it’s interesting how such a small design choice can split people.
Related: Everything you need to know about the Samsung Galaxy Tab S3
Galaxy S7 13
Housed inside the home button is a really fast and accurate fingerprint sensor that matches the iPhone 6S’s for speed, but it’s marginally slower than the Nexus 6P’s. That difference is minimal, though, and something you would only notice if you had the two side by side.
It’s clear from the Galaxy S7 that Samsung is listening to customer feedback and bringing back favoured features from the Galaxy back catalogue. MicroSD expansion is one, and IP68 water resistance is another.
The latter is by no means a vital feature, yet it’s impressive that it’s been added without any forced changes to the design. There are no flaps, there’s no added thickness and no extra space between the display and glass.
What does an IP68 rating mean? Well, you’ll be able to dunk the Galaxy S7 into 1m of water for up to 30 minutes without damaging the phone. Or, if you’re like Lil’ Wayne, you can douse it in multiple bottles of champagne. Obviously.
It’s become a cliche that phones get thinner and thinner each year, but that isn’t the case with the S7. It’s marginally thicker than its predecessor and has a nice weight to it. It feels dense and expensive, though not as delicate as you’d expect from a phone with glass on the front and back. I dropped it about four foot onto a hard floor and it survived without any problems.
Samsung has stuck with the same 5.1-inch display, there’s the Galaxy S7 Edge if you want something bigger, and it’s refreshing to have a flagship phone that feels this compact and easy to hold. It’s roughly the same size as the iPhone 6S, which only has a 4.7-inch screen, and much smaller than top-end devices from LG, Huawei and Google.
Coming from using the S7 Edge, I was initially a little underwhelmed by the Galaxy S7. It didn’t quite have that wow factor its curvier sibling does. But after a while it became my favourite phone to use on a daily basis. It feels great, is the perfect size and doesn’t make any sacrifices – aside from maybe the speakers – to get there.

Related: Best Android smartphone 2016
s7 7

Samsung Galaxy S7 – Display

Close to perfection. That’s the best way to describe the display on Samsung’s Galaxy S7.
Not much has really changed from the outgoing S6, but this still holds up as the best screen on a smartphone.
It’s still a 5.1-inch QHD panel with a 2560 x 1440 resolution, and just like every Galaxy flagship so far, it uses Samsung’s Super AMOLED tech, rather than the more common LCD.
AMOLED displays are a lot better at showing off blacks than LCDs. Instead of looking slightly grey and washed out, the blacks here are inky deep. Some say AMOLED screens produce colours that are too oversaturated, so reds will look way brighter than they should, but that isn’t much of an issue here. And if you really prefer things toned down, there’s a picture setting for that.
Having so many pixels jammed into a relatively small space means you can’t really spot one pixel from another, and that sharpness makes everything from gaming to watching YouTube an absolute pleasure. Play a round of Alto’s Adventure or Monument Valley on this display and you’ll instantly be drawn in by the crisp details and vivid colour reproduction.
I wouldn’t normally watch a film on a screen this size, but the panel here is so gorgeous that I can’t help getting lost in it.
Galaxy S7 4
The one thing that has changed this time around is the addition of a new ‘Always-on’ display.
Due to the way AMOLED screens work, they don’t need to light up the whole display all of the time. They can select individual pixels and just show them, keeping everything else off. So, when the Galaxy S7 is locked it can still show the time, date and a couple of bits of other information on the screen without eating through too much battery.
It’s a nice touch, and great for quickly checking the time when the phone is resting on your desk or a bedside table. But it’s a good software update or two short of being really useful.
First off, it’ll only show notifications from a few apps – it’s currently limited to Samsung’s own Messages, Email and Phone. If you, like me, regularly use WhatsApp, Gmail and Facebook Messenger, none of these will appear. That’s a shame, and makes the notification side of things a lot less useful.
I’d also like a lot more control over the mode. There’s no setting to alter the brightness, which causes some problems when you’re in a darker room, and aside from choosing whether or not you want a calendar showing, there’s no customisation allowed.
s7 9
It uses extra battery too. About 1-2% per hour, so 15% or so per day. It’s just about worth it, but it could be so much better.
My only gripe with the display on the Samsung Galaxy S7 is that, in sunny conditions, it can be quite hard to read – certainly more so than the LCD panel on the iPhone 6S. Even with the brightness jacked all the way up, you’ll have to tilt the screen or find some shade to stop yourself squinting at it.
Thankfully, unlike the Galaxy S7 Edge, it has great viewing angles and doesn’t suffer from white backgrounds getting tinged with blue.

Best Deals for Samsung Galaxy S7

  • Compare plans
  • amazon
  • ebay
$0.00 upfront $45.00 /mth ($9.00 plan + $36.00 phone) 100 Minutes
$0.00 upfront $46.43 /mth ($12.80 plan + $33.63 phone) 1000 Minutes
Unlimited Messages
500 MB data info
$20.00 upfront $96.25 /mth ($70.00 plan + $26.25 phone) Unlimited National Talk & Text
Unlimited Messages
Unlimited data info
$30.00 upfront $68.96 /mth ($40.00 plan + $28.96 phone) Unlimited National Talk & Text
Unlimited Messages
1000 MB data info
$519.00 upfront $3.00 /mth ($3.00 plan + $0.00 phone) 100 Minutes
info
VIEW ALL DEALS POWERED BY

Faslane

February 21, 2016, 7:19 pm
How about getting the date right in the headline. It's 2016 not 2015....ugh. My 6 year old nephew could write this shit better.

toboev

February 21, 2016, 7:41 pm
What does "95% brighter photos" mean? Were they too dark before (underexposed)?

Apocalysse

February 21, 2016, 8:01 pm
I think it's under low light :)

Oberoth

February 21, 2016, 10:44 pm
Sarcasm is always hard to pick up on in forums but just incase:
95% brighter photos is misleading, they are trying to say the phone will now take photos at a lower, less noisy ISO or better yet a faster shutter speed to reduce any blurry photos.

toboev

February 21, 2016, 11:10 pm
No sarcasm intended. Given that obviously the photos themselves are still going to be correctly exposed - not any brighter than before - are they implying that I can get away with, roughly, halving of the shutter time in the same shooting situation? If so how so? The aperature increase from f1.9 to f1.7 won't do that, it is not a full stop increase.

Oberoth

February 21, 2016, 11:21 pm
This is true but there are several other factors coming into play, the main one being Samsung's new sensor tech, Britecell. You can find out more here: http://www.trustedreviews.com/...

André Brasil

February 22, 2016, 8:23 am
No big changes there, it sounds like a Galaxy S6 "S" to me...

toboev

February 22, 2016, 10:34 pm
This headline:
"Hands-on with the Samsung Galaxy S7: An impressive upgrade to the best phone of 2015"
What's wrong with the date, I don't get it? Or did they already fix it?

Donald

February 22, 2016, 10:37 pm
Just compare this to the first Galaxy phone from 2009 and the first S from 2010 - and they cost nearly £500.

Brian

February 23, 2016, 1:33 am
I'd say they're pretty big coming from an S6 that's terrible on battery, doesn't allow expandable storage, and isn't water/dust resistant.
Who knows why they had these features on previous phones but got rid of them, money and marketing most likely? All I know is I'll be returning the S6 I just bought to pre-order the S7...

Kiranpal Pendyala

February 23, 2016, 8:13 pm
I suppose they meant that the improvements in aperture and the sensitivity of the sensor, the camera is now capable of almost double the low light performance of the older model.

Alan Flores

February 24, 2016, 9:15 am
The Product seems to be launched in Dubai.
https://prologix.ae/index.php/...
The price is AED2,499 nearly £620.

RM

February 24, 2016, 5:42 pm
Not a huge deal but wondering if they addressed the group text issue. Texts showing up as individual and not being able to see who's in the group.

Shamz

February 25, 2016, 7:14 pm
Another phone already? I guess I'll wait for Galaxy S10. It's just around the corner.

Hrion

February 26, 2016, 8:31 am
Nothings wrong with the headline, They are just saying that Samsung S6 was the best phone of 2015 and so S7 is an upgrade of that

RunningGreat

March 2, 2016, 1:50 am
Looks like it's got everthing I want in a phone. Looks, Water-resistance without flaps, best screen, best camera, mst/nfc card support (can already be used at 90 percent of U.S. retailers that already use magnetic strip readers.), plus sdcard, vr support. lovely.

Thuglife

March 3, 2016, 4:00 pm
Waitn for my s7 edge iPhone is played out

Ses

March 6, 2016, 12:53 pm
You might want to ask her to read the article for you next time.

Dead Words

March 8, 2016, 3:27 pm
It has been a year you know. The same as Apple, twice as good as Sony.

toboev

March 8, 2016, 5:18 pm
But it's a Sony sensor. No 'Britecell' or Samsung tech there.

Oberoth

March 8, 2016, 9:27 pm
yep you are right, that came out after i wrote my comments. I was surprised not to see a Britecell in use after all the marketing hype they generated for it. I wonder what it will get used in? Note 6 maybe?

Andrei Low

March 10, 2016, 3:24 pm
Have you tried inserting a SIM in it? Is it true that it locks on that network automatically?

Kadeem Wiz Jones

March 11, 2016, 9:12 pm
I have the S7 and I like it. no complaints yet other than the poor quality headphones provided with the phone. For the phone itself, so far its better than my Note 4 and thats really all I care about

Adam

March 13, 2016, 11:26 pm
Andre, I am guessing you are from Brazil. If so, have you tried to dictate text messages in Portuguese? Did it work or did it just type gibberish? I tried 2 phones already, but none has been able to recognize Portuguese. Is it my luck or is it a problem with S7? Thanks.

Justin

March 15, 2016, 3:57 pm
Main problem I am finding is the video angle due to the 4.3 sensor, on the s6 it had a 16.9 so when you start recording it kept the wide field of view. On the s7 it crops the sensor to create the 16.9 ratio and in doing this zooms in a hell of a lot. I wish they had kept the sensor ratio from the s6 as this seems like a step backwards on a otherwise great phone

مرحبا بك

Résumé qaisi1web
سلانكي

جميع الحقوق محفوظة | سلانكي مدونة سمسم للمعلوماتية أعلن معنا رخصة الإستخدام والنشر خريطة الموقع سياسة الخصوصية تصميم : اسلانكي | الأفضل لكم